What the heck is a pocket letter?

When I first heard the term “pocket letter,” I thought it might be something simple like a letter in a pocket. 

Or could it be . . . a letter ON a pocket?

I’m not seeing the craft possibilities yet. Oh, I know! It’s a letter that USED to be a pocket! I feel so smart.

Wait. What? That’s not it either? So what in the heck is this newfangled fun craft thing that so many scrapbookers are crazy about—and that has the unofficial endorsement of the United States Postal Service?*

My friend Jennifer sent me a link to a Pinterest folder: Pocket Letters. She suggested we try to make some and send them to each other. I was in Ohio and she was in Florida, so it was kind of a nice way to do a craft together—but apart—you get it.

So we did. And we agreed to photograph our PLs (we quickly created an abbreviation to keep from having to write or type the words over and over again) and to post them on Pinterest for others to share and adore. That was almost a year ago! We have had a blast. Let me show you some and give you some ideas for how to start your own #PLPenPalProject.

A Few of Our PLs

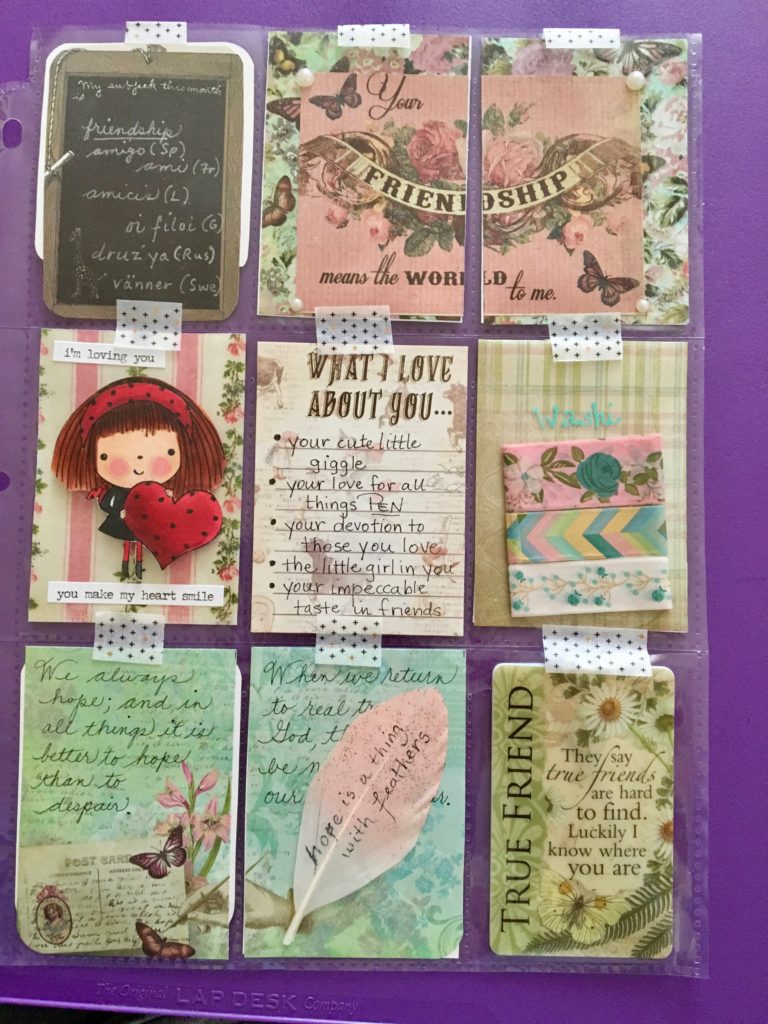
This one has a friendship theme. I made it very personal for Jennifer, the recipient. The middle row, far right pocket has samples of some washi tape I wanted to share with her. I wrapped 3-ft lengths around a piece of mylar I cut from some packaging. Good use for that mylar stuff instead of throwing it in the trash!


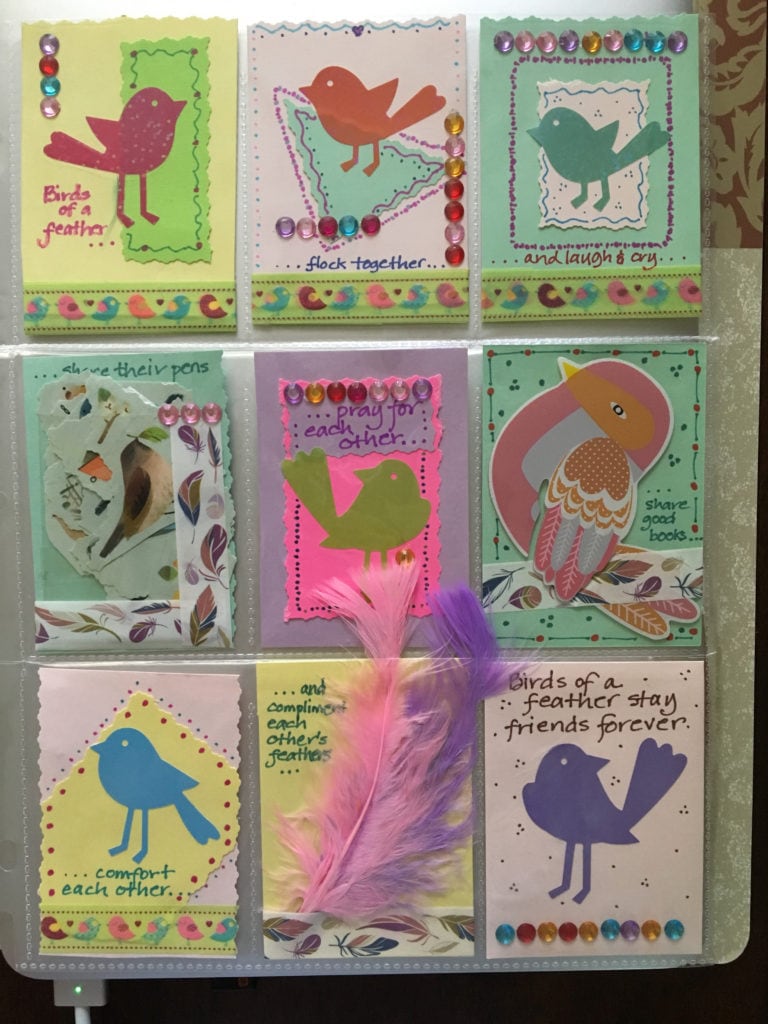
Jennifer sent me this one with a birds-of-a-feather theme. She included stickers for me to use (middle row, left) and some adorable feathers!

As you can see, coming up with a theme is half of the idea. Then you can have fun finding all kinds of things to add. Some themes we’ve used or seen others use include:

  • back to school
  • our home state (Ohio/Buckeyes for me!)
  • by the seashore
  • quotes about pennies, with a penny in each pocket
  • owls (whoooo doesn’t love owls???)
  • kitties (see above, but kitties)
  • fall/autumn
  • Christmas
  • patriotism–4th of July
  • summer fun
  • coffee and tea
  • sweet stuff (cupcakes, candy, etc.)
  • I could go on all day, but you get the idea. Check out the Pinterest link for tons of ideas!

Now that you can tell what PLs are, I’ll walk you through making one of your own in our next post.

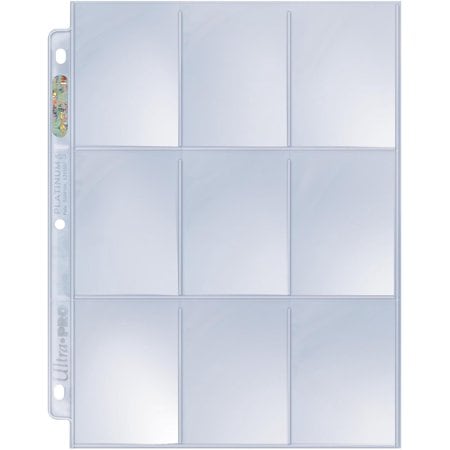
P.S. Go get some baseball card protector sleeves:


*I made that up. But I’m sure they appreciate the increase in actual snail mail that’s hitting their inboxes—I mean, mailboxes—lately. Maybe they don’t like the lumpiness or the fancy, schmancy hand lettering on the envelopes. Hey, for 50¢ (so far, but who knows what with tariffs and such—just kidding!!!), it’s a heck of a deal to send these things. Maybe they’ll even get where they’re supposed to go–and in one piece!


Super-Easy Pet Cushion Project

We have a new member of the household. His name is Kirby—after tossing around dozens of names and circling back to the one that really describes what he does best, sucking up stuff on the floor and making it disappear. He’s a Pekingese and an Easter baby. Yep, the Easter bunny brought this little fellow on April 8. (Which just happens to be MY BIRTHDAY, too, and was too much of a cosmic coincidence for me to ignore.) Having a little pocket pet offers all kinds of crafting opportunities, including the creation of costumes and outfits that he’d be mortified to wear if he had just an ounce of self-awareness. In due time, my little puppy, in due time.

I’m starting with more basic projects, however. He’s being crate-trained, as most household dogs are, and I can’t stand the thought of his little puppy underparts lying on the cold, hard, plastic, cookie-sheet-shaped, slide-out base of the cage. I also don’t want to give up any of my good towels. Here’s a chance to use my crafty brain to cook up something simple, yet wonderful.

I scavenge through the house, looking in drawers, closets, and my sewing area. Voilà! I spy some oldish pillowcases whose matching sheets have long since been used for dust covers in the garage. A little feminine, yes, but he’s a modern pup—it’s all about recycling. I take the first pillowcase to my sewing station, flatten it on my cutting board, and unroll a batch of batting. Using the pillowcase as my pattern, I cut a folded (doubled) piece of batting about an inch smaller around the edges than the pillowcase. Then I insert the doubled piece inside and pin the four layers flat. Using a larger stitch than normal, but not a full basting stitch, I sew around the perimeter of the pillowcase, securing the batting.

That’s it! All done! It is the perfect size to fit inside the doggie crate, and it’s pretty, cushiony, and so washable. I’ll make 3 or 4 so I can rotate them between wash days. Kirby doesn’t even mind the darling little ruffle on the end. See? He’s just happy his owner is such a crafty lady.


Once a Teacher…

always a teacher, at least in my heart. I think that’s true of so many of us who spent a few years in the classroom but moved on to other careers or responsibilities, like raising our own kids. It’s been more than (ahem, garble, mutter) years since I stood at the doorway, greeting students on the first day of school. I was as nervous and excited as they were, maybe more so. But none of us looked nervous. No, that would have been so uncool—and a huge mistake for me. To teach a herd of teenagers, one has to be confident, a bit aloof even, and definitely able to deliver “the look” with deadly accuracy. I think it took me about 4 years to accomplish all that.

I loved teaching, loved the teenagers (really!), loved the subject matter (writing, literature, and American history), and loved the growth I saw from their freshmen through senior years. I didn’t like the drama, but that mostly came from other teachers and the administration. Honestly. Why did I leave teaching? Long story…that ended in Florida and began a new chapter working with children’s and YA literature. It’s all been very good.

So, what’s my craft du jour that dovetails with this post? How about something simple you can make for either your teen student or a teacher buddy? It’s fresh, functional, and fun!

  All you need is a small terracotta pot (with bottom), a bit of Styrofoam, a silk flower, and some school supplies. I used green paper clips, green pencil-top erasers, pencils, highlighter, scissors, ruler, Post-It notes, stickers, glue stick, red marking pencil, and pencil sharpener. Glue the pot to its bottom, sliding it toward the back so you can place stuff in front of the pot. Then shove the Styrofoam down into the pot. Glue a wooden clothespin to the back of the pot so it can hold notes and sticker sheets. Push down into the Styrofoam the pencils (sharpened is easier), highlighter, glue stick, scissors, ruler, and flower. Put a small Post-Note pad and sharpener in the bottom . Sprinkle the green paper clips and erasers around the objects, covering the Styrofoam. Voila! A desktop delight for teens and teachers alike.


Buckets o’ fun

In my quest to get organized, I had to go beyond the hanging organizer (see previous post). Yes, it’s finished! I think it turned out pretty-kitty well and it also got filled up pretty-kitty fast. I think it looks pretty-kitty pretty. Don’t you just love themes?

What could I do with the other stuff that didn’t fit into one of those pockets? Put it in bags? Bins? Boxes? Baskets? Buckets! But buckets are ugly and bulky, right? Well, not anymore. Introducing my “buckets o’ fun”! The first one I made is sans handle, but I think I’ll add it later. It continues the kitty theme, but not quite as directly as the new brown bucket. See that kitty on the front? I just imitated one of the kitties in the fabric used for the liner (same fabric used on the hanging organizer).

Now I’m using my buckets to hold things like rick-rack packs, patterns, notions, and little remnants that I might used for other things. Instead of a pile of mess, I now have some cute, coordinated organizers to help me be less cluttered.

In the next couple of days, I’ll be posting a pattern and instructions on how to make your own lined buckets. I hope you have buckets o’ fun, too!


Getting organized is messy

McCall's Crafts M6374

I found a fun and practical pattern for making lots of things to help keep some of my sewing and crafts more organized. It’s McCall’s Crafts pattern M6374. I can’t imagine paying $18.95 for a pattern—remember back in the good old days when patterns were in the $1–$3 range?—so I was THRILLED when Hobby Lobby had their occasional sale of all patterns for 99 cents. (It’s beyond satisfying to buy things for 99 cents, isn’t it? I love to wander around dollar stores.) So I bought four patterns, but knew this one was the one I’d open first. Why?

Because I need to get organized. I thought the wall-hanging organizer would be a good idea so I can get things off my sewing table, but still keep them handy. I’ll just hang it within reach while I’m sewing. (Oh, and a huge THANK YOU to my DH, Eric, for buying me a new sewing machine! Love it!) But things had to get a little messier before they got better. Isn’t life like that sometimes? I remember hearing that when I was going through some counseling several years ago. It’s like needing surgery. In order to heal, sometimes we have to get cut open, which can be very messy and painful indeed. And sometimes we need someone outside ourselves to help. For me, that has included God, close friends, special family members, and the occasional mental health professional. The end result, though, is worth all the tears. It means moving forward with more light and less darkness, more self-control and less trying to control others.

So here’s the messy part of my project: cutting out the 20+ pieces that are supposed to become an organizer. When I saw how many pieces were involved, I have to admit that I almost changed my mind. Instead, I decided to read through the directions so I could understand what each piece was, how it was sewn, and what purpose it served when finished. I did just that, and **Surprise!** it all made sense! I cut out each piece and began sewing. Less than 24 hours later, I was finished!

I love this bright, sparkly, kitty-laden organizer. Now I want to get busy making some matching accessories: probably the square pincushion and some of the round boxes to hold lots of goodies. Stay tuned for finished products in the next post!

I hope you’re learning how to put all your pieces in the right places, too. Thanks, friends, for coming along for the journey.